A single certificate can generally be used for all courses on a site, but it is also possible to have different certificates for different courses.
Introduction ... Certificates in the Wild
Generally speaking, the most common use case is for a site to have a single certificate for a site. A few convenient Bright defaults make it easy to do:
First, courseembedders like certificates can get their COURSE ID from a URL parameter, typically 'bright_course_id'. So all that is necessary to generate a certificate for any course is to link to the generic certificate page with the course ID in the URL. See also how to specify the course ID for a course embedder.
All you need is a bright certificate template embedded on this page, and you should be good to go. IF you use the bright 'class' template, generating this link is built right into the template see the template documentation here.
Some other things to remember:
generally you'll want to use a page template that has no stuff on it, which will just interfere with certificate.
If your site generates garbage on the page that shows up when the certificate prints, the solution for this is to use print media CSS to set these elements to a 'display' of 'none'.
Setting the Certificate Background Image.
The certificate background image can be changed directly from the wordpressshortcode/bright embedder. Note whatever image you use, it will be scaled to 1200x800 pixels, so if your image has these dimensions [3/2] initially, you will have a better result.
Normally, the site title and URL will appear in the lower left corner of the certificate. You can suppress this behavior with the no_bloginfo attribute to the bright embedder.
[bright template='certificate' no_bloginfo='t'/]
Changing the Introduction Text
This defaults to This Certificate of Completion is presented to, but can be changed like this:
[bright template='certificate' introduction=You did it!/]
The default is: This Certificate of Completion is presented to
Changing the Accomplishment Text
This by default is for successfully completing. Use the 'accomplishment' attribute to change this:
[bright template='certificate' accomplishment='for satisfying all of the requirements of'/]
Changing to a European Date Model
You can render the completion date as DD-MM-YYYY with:
[bright template='certificate' date_model='EU'/]
How is this Display Name Derived
The certificate will be render with the display name, as defined in the learner's website profile. If no display name is set, the following will be attempted:
if the user has a last name defined, we will render first name last name
if their is no display name and no last name, the email address is rendered.
Controlling Certificate Criteria
You have fine-grained control over by what criteria a certificate can be offered, and what message to show the user if they've failed to meet their criteria:
[bright template='certificate' criteria_field='score' criteria_value='80' criteria_operator='>' criteria_comment='You must pass with at least a score of 80 to access your certificate']
In the above, we use the following attributes:
criteria_field - describes the field in the user's registration to use as the certificate criteria. Defaults to 'success'.
criteria_value - the value to compare with the {{criteria_field} above. Defaults to 'passed'.
criteria_operator - the operator to use in comparison. The default is '=='.
criteria_comment - If the user fails the criteria, they can mouse over the 'N/A' that is displayed in lieu of the certificate link to receive this message. Defaults to 'You must pass and/or complete the course to receive your certificate.'
Changing the date format
By default, we write out the US Model of
Month,Day,Year
For a European Model of
Day,Month,Year
use:
[bright template='certificate' date_model='EU' /]
Note: The date rendered is the completed date. If no deleted date is set by the CourseProvider (SCORMCloud, TinCan LRS, etc), the last accessed time that can be derived for the course is used.
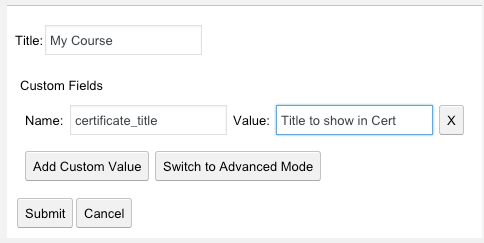
Changing the Certificate Title
You can override the certificate title in a couple of ways.
First, you assign a title for all certificates in the embed shortcode:
[bright template='certificate' title='A Special Certificate Title']
Note, this is generally useful only if you are using custom certificate links from another template.
You can change the title by course, by setting certificate_title as a custom course properties.
Note anything you return from this filter will be included in the generated template, so be sure to use position:absolute and the content-over-cert-image CSS class.
Bright Clean Page Template
Bright includes a page template called "Bright Clean Page". We recommend using this for certificates as it removes much of the theme cruft that can interfere with rendering for display and print.
ScreenShot
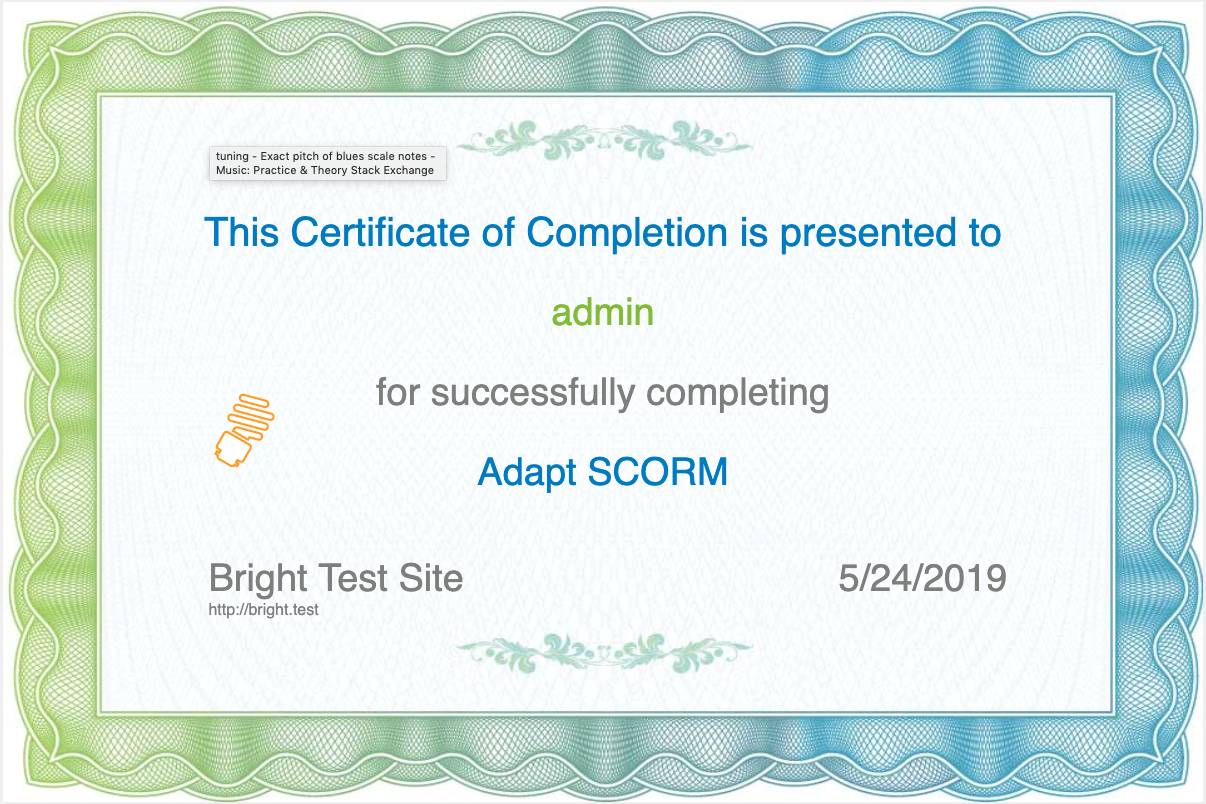
Here's an example certificate, as generated without any specific configuration:
The actual shortcode used to generate this:
[bright type='course' template='certificate' introduction='You did it!' title='Just Say No To Inflexible Shrink-wrapped LMSs' display_name='E-learning Innovator']
Note a few 'undocumented features' are revealed here:
use the display_name= attribute to change the User Name. This might useful for manually generating certificates and emailing them to people who for whatever reason can't generate their own.
use the title= to override the title of the course. Again, you can use this essentially to manually generate any site certificate you want. We recommend you do this on a specially protected page and not on the user accessible certificate pate.
Printing
The Bright certificate template includes javascript that will attempt to put the user's printer into landscape mode. We also use print media css to try and move theme elements out of the way. That being said, it is entirely possible that additional site elements will bleed into the printable version. Never fear, just track down the CSS selector [Chrome Print Media Emulation mode is a very quick way to do this], and then just use your site style.css [or any CSS loaded on the site] to hide the elements: